 Activities
 Elsewhere Online
Links
Elsewhere Online
Links

Trip Around the World
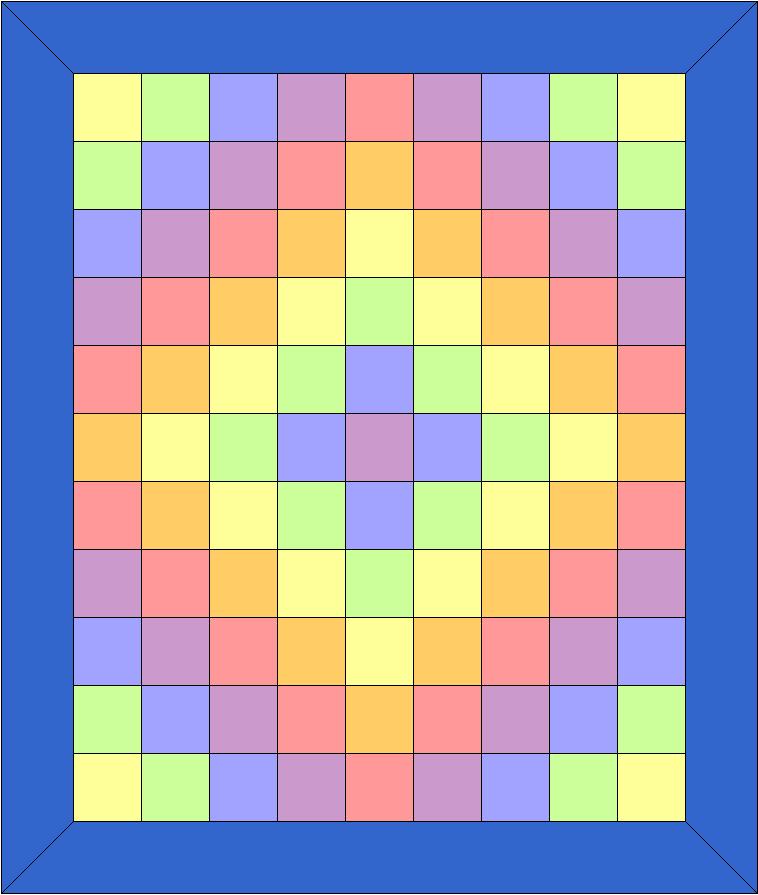
Drawing of Trip Around the World Quilt, different fabrics will make the quilt look different.
This quilt was designed to use fat quarters. Since not all fat quarters are exactly 18" wide, I chose to cut my squares at 4.25". This will allow you to use a single fat quarter for most colors. Two of the colors appear more often than the rest. You will need slightly more fabric for those two colors.
Materials
1 fat quarter yellow
1 fat quarter orange
1 fat quarter green
1 fat quarter blue
1 generous quarter yard cut purple (slightly more than a fat quarter!)
14" cut of rose (slightly more than a fat quarter!)
2/3 yard darker blue border fabric
1/2 yard fabric for binding (less if same as borders)
batting
fabric for backing
thread for piecing
thread for quilting (if desired)
floss or crochet thread for tying (if desired)
Tools:
Rotary cutter, mat, and 6"x 24" ruler
Sewing machine and basic sewing supplies
Iron and ironing board
Cutting
- For the yellow, orange, green and blue fabrics, cut each fat quarter into four strips measuring 4.25" x 21".
- Cut these strips into four squares of 4.25". (You should end up with 16 squares of each fabric.
- From the purple, cut two 4.25" strips using the entire width of the fabric)
- Cut 4.25" squares from these strips. You will need 17 of them.
- From the rose fabric, cut 2 or 3 4.25" strips.
- Cut 4.25" squares from these strips. You will need 18 of them.
- Trim off the selvages of the border fabric.
- Cut five 4.5" wide strips from selvage to selvage from the border fabric.
- Cut five 2.5" wide strips from the binding fabric
Sewing
- Lay out your squares as shown above. (If you have directional fabrics, pay careful attention so they all face the same way.)
- Mark the left block of each row with a row number.
- Pin together squares in preparation for sewing the rows.
- Sew the blocks together into rows.
- Iron the seams in the odd numbered rows to the left (towards the row marker).
- Iron the seams in the even numbered rows away from the row marker.
- Sew the rows together.
- Measure, cut, pin, and sew on the border pieces to the two short sides of the quilt.
- Press seams towards the borders.
- For the two longer borders, sew two pieces together to get the length you need.
- Again, measure, cut, pin, and sew on the border pieces to the two long sides of the quilt.
- Press seams towards the borders.
- Layer backing, batting, and pieced top.
- Baste with thread or safety pins if quilting.
- Trim edges.
- Make binding and apply it to the quilt.
Quilt as desired. Meandering will look nice, or try using a walking foot and sew diagonally through each block to create large concentric diamonds.
Or simply tie the quilt with a knot in the middle of each square.
For more details on finishing the quilt, there are a number of very good books for beginning quilters in our library or you can consult any number of web sites, such as About.com's Quilting pages.